Adding Product Sizes in ShopMart (Single-Vendor E-commerce System)
This guide explains how to add product sizes in ShopMart, a single-vendor e-commerce system.
Overview:

In the ShopMart admin panel, you can define product sizes, such as Small (S), Medium (M), Large (L), etc. Each size includes:
- Name: The name of the size (e.g., Small, Medium, Large).
- Size Code: A code representing the size (e.g., S, M, L).
- Slug: A URL-friendly version of the size name (e.g., “small” for Small).
Steps to Add a New Size:
- Access the Admin Panel:
- Log in to the ShopMart admin dashboard.
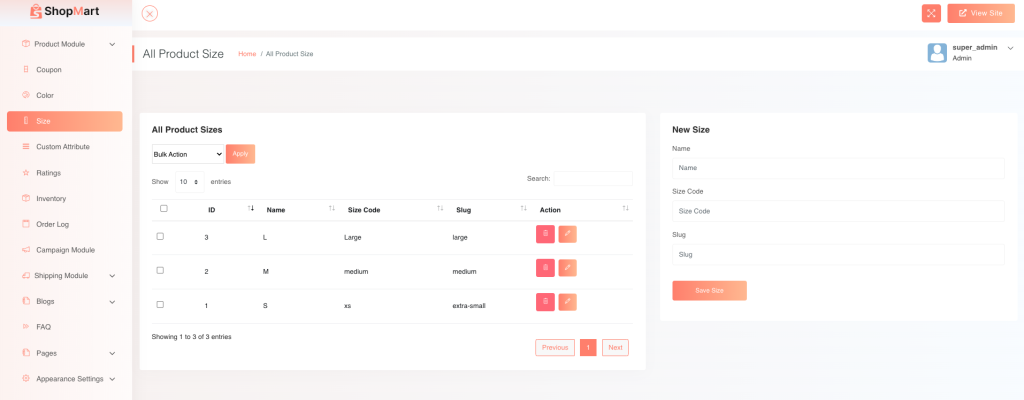
- On the left sidebar, under the “Product Module,” click on Size.
- Fill in the New Size Form: You will find a form to the right of the screen where you can add a new size.
- Name: Enter the name of the size (e.g., “Small”).
- Size Code: Provide a short code that represents the size (e.g., “S” for Small, “M” for Medium).
- Slug: Enter a URL-friendly version of the size name (e.g., “small”).
- Save the Size:
- After entering the details, click Save Size.
- The new size will now appear in the “All Product Sizes” table on the left.
Managing Existing Sizes:
- Editing a Size: To edit a size, click the Edit button (pencil icon) next to the size. Modify the necessary fields and save.
- Deleting a Size: Click the Delete button (trash can icon) next to the size to remove it.
Bulk Actions:
- You can apply bulk actions (e.g., delete multiple sizes) by selecting the checkboxes next to the sizes and choosing an action from the “Bulk Action” dropdown.

