

Client Panel
Jump to: User Dashboard · Chatbots · Chat List · Knowledge Base · Manage Tickets · Subscription · Manage Contacts
User Dashboard
The User Dashboard provides an overview of key features and activities. As shown in the image below, users can quickly access important sections such as the Knowledge Base, Chat, and Tickets.
The left sidebar contains the main navigation menu. At the bottom of the sidebar, users will find options for User Settings/Profile and Logout.
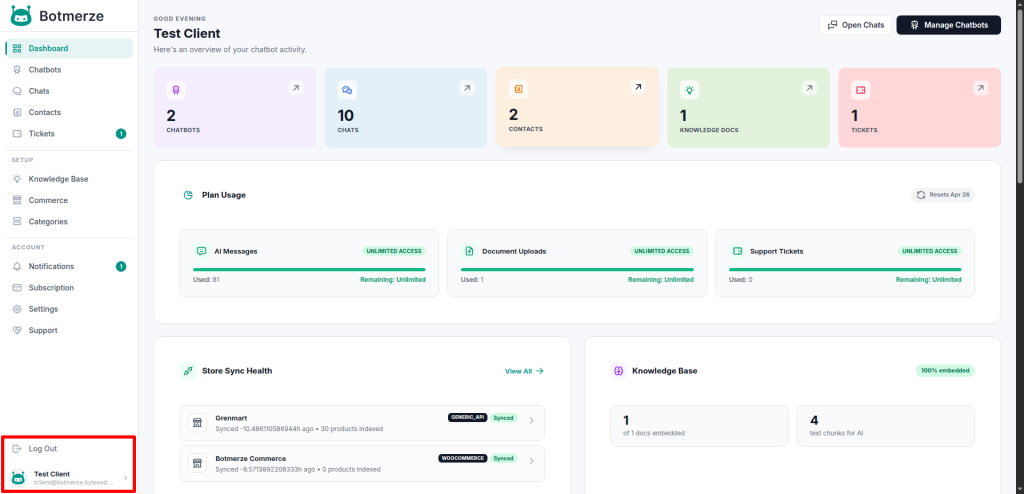 Screenshot
User Dashboard
Notifications
The Notifications page displays all system notifications related to your account. From the top-right corner, you can mark all unread notifications as read with a single click. Selecting any notification will redirect you to the corresponding page or event for further action.
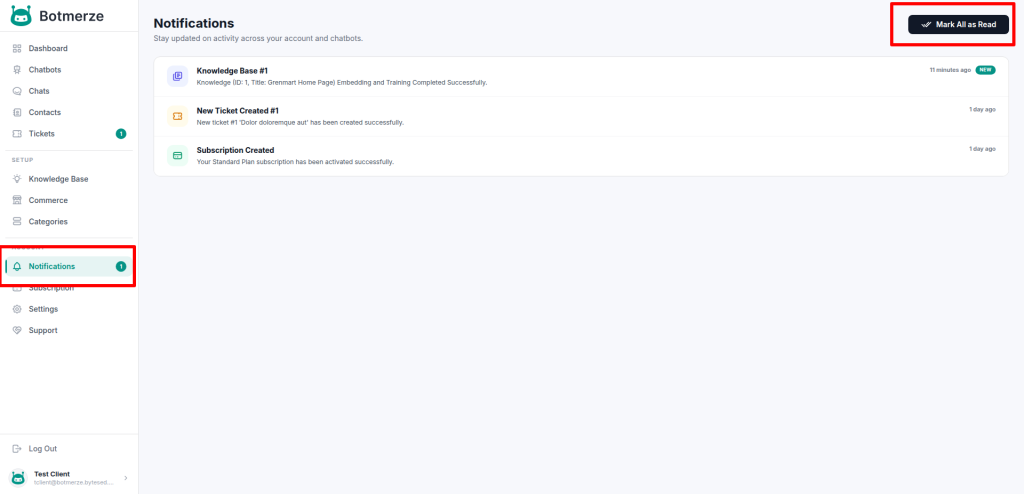 Screenshot
User Notifications
Categories
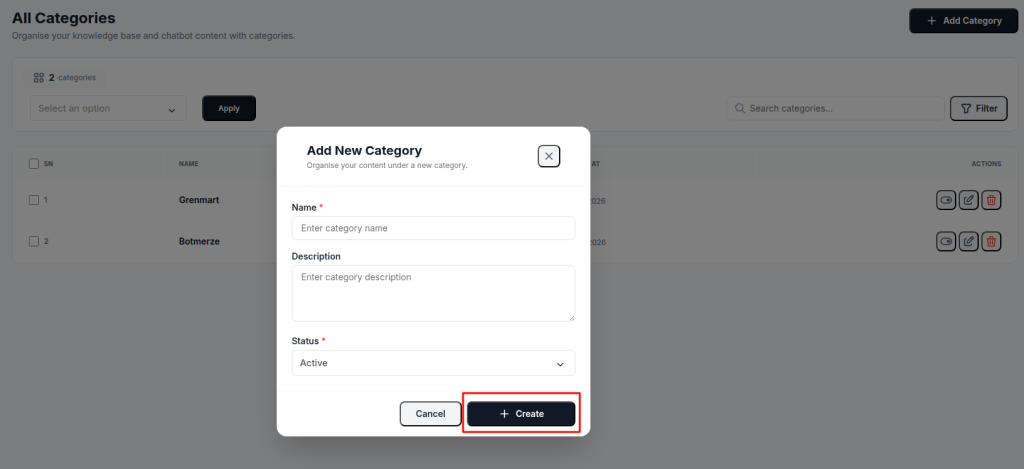
The Categories page allows you to manage all categories. From the top-right corner, you can use the search and filter options to quickly find specific categories.You can also create a new category using the Add New button.
Additionally, the Bulk Actions feature enables you to activate, deactivate, or delete multiple categories at once.
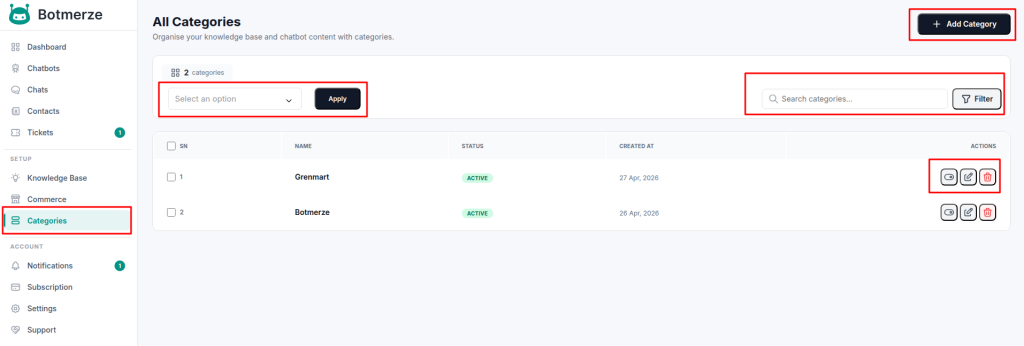 Screenshot
Categories
New Category Create Form
 Screenshot
Chatbots
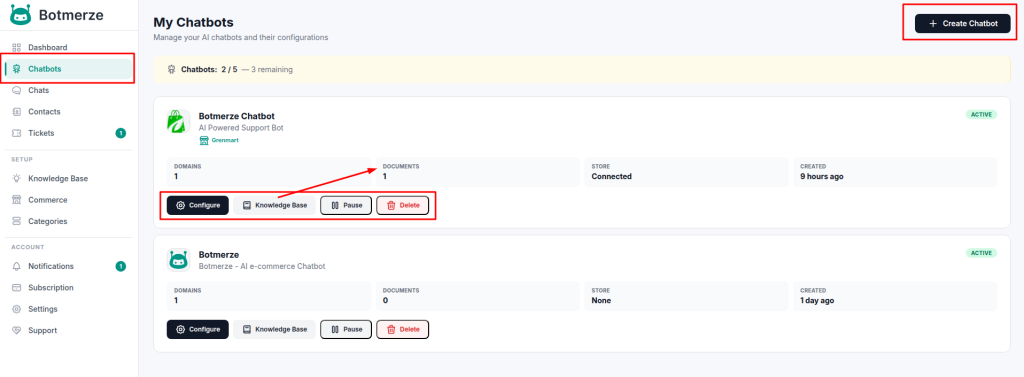
To access the Chatbots page, click Chatbots from the side navigation menu. Here, you can view all your created chatbots. On the top-right corner of the page, you will find the Create New Chatbot button to add a new chatbot.
 Screenshot
Chatbots Page
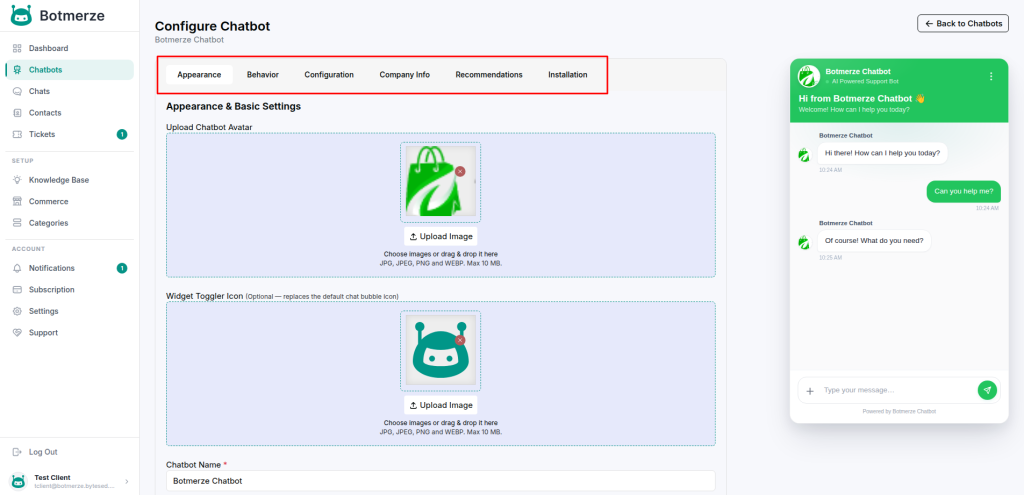
From the chatbot list, click the Configure button to view the details of an existing chatbot. You can manage all chatbot-related settings, update information, and customize the bot as needed.
 Screenshot
Chatbot Details
Create New Chatbot
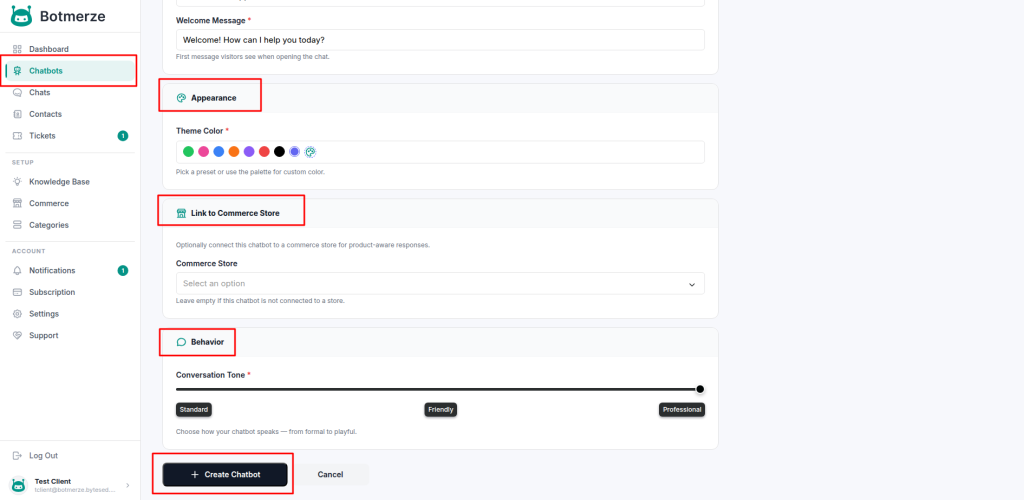
Click the Create New Chatbot button to open the chatbot creation page.
On this page, you can configure the following:
-
Upload a chatbot avatar
-
Enter the chatbot name
-
Add a short description
-
Set a welcome message
-
Choose the appearance theme color
-
Select the eCommerce store for which you are creating the chatbot
-
Choose the chatbot conversation tone
After completing the form, create your chatbot and continue with further setup.
 Screenshot
Create Chatbot
Configuration
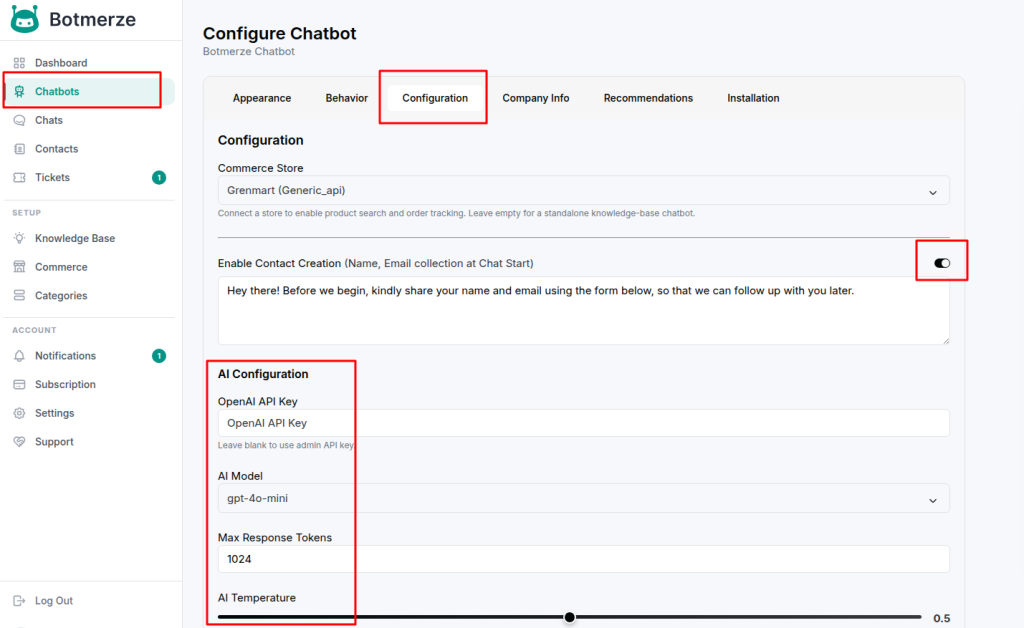
The Configuration tab allows you to control how the chatbot collects user details, interacts with the OpenAI API, and manages response generation. This section includes all essential settings that determine how your chatbot processes user messages and produces replies.
Contact Creation Settings
-
Enable Contact CreationWhen enabled, the chatbot will collect the user’s name and email address at the start of the conversation for tracking and follow-up purposes.
-
Total Contact Created:
3 / 1999Displays how many contacts have been created out of your remaining limit. -
Contact Request MessageYou can customize the message shown to users when the chatbot asks for their details:“Hey there! Before we begin, please share your name and email address using the form below, so we can follow up with you later.”
OpenAI API Configuration
-
OpenAI API KeyYou can input your own OpenAI API key to power the chatbot.If left blank, the system will automatically use the admin-provided key.
-
AI Model for ChatbotSelect which AI model the chatbot should use for generating responses.
AI Response Settings
Higher values = More Creative
Lower values = More PreciseDefault: 0.2
AI Response Max TokensMaximum number of tokens allowed for each AI-generated response.Default: 2000 tokens
User Query Max LengthMaximum length of user messages accepted by the chatbot.Default: 1000 characters
AI Response TemperatureControls how creative or precise the chatbot responses will be.
 Screenshot
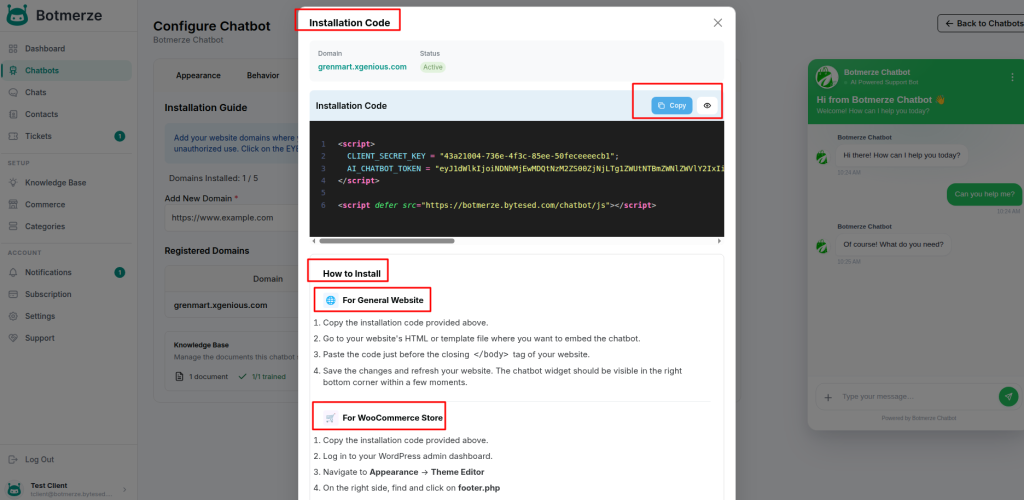
Installation
The Installation tab provides the integration tools needed to add the chatbot to your website.
From this panel, you can:
-
Retrieve your chatbot installation script
-
View all registered domains along with their status
-
Remove or manage domains using the action buttons
-
Find the embed script needed to install the chatbot on your site
This section ensures you can easily deploy and manage the chatbot across any domain you own.
 Screenshot
Chat List
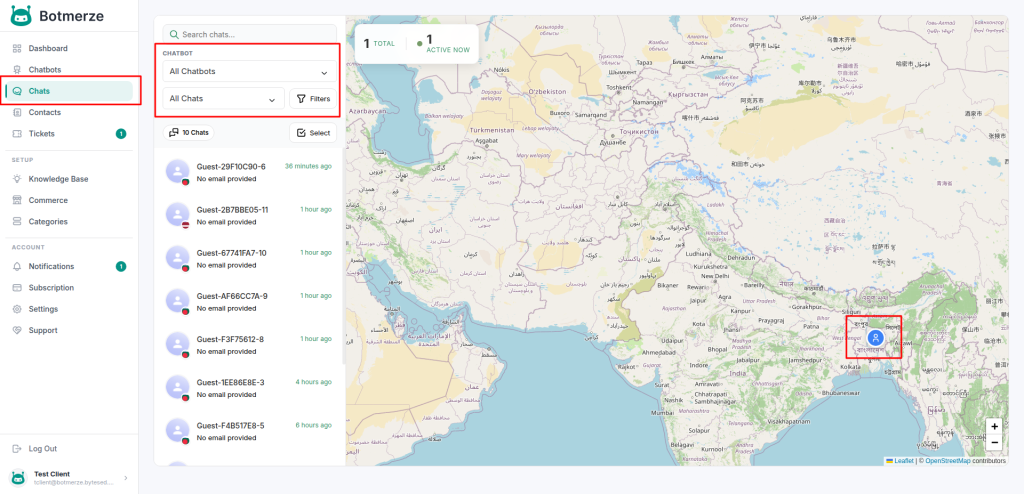
The Chat List page displays all conversations handled by your chatbots in one central location, making it easy to monitor visitor activity and manage customer interactions.
You can also view a visitor map that shows the locations of users visiting your website.
 Screenshot
Chat List Page
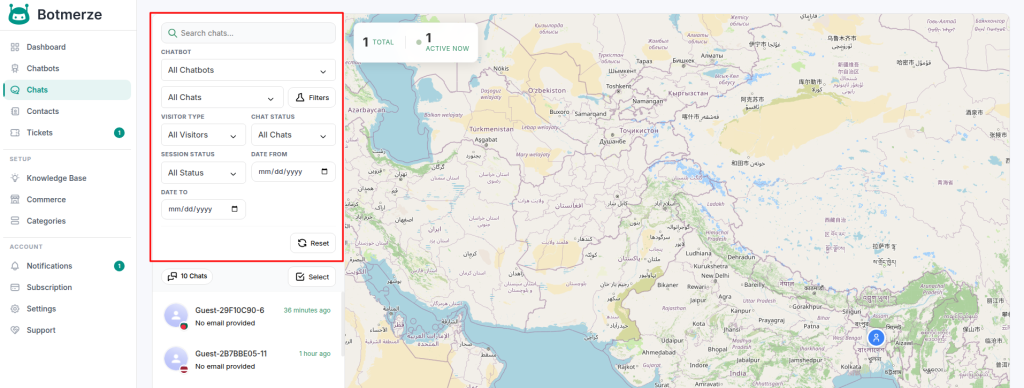
By default, the page displays conversations from all visitors. You can use the available filters to organize chats based on your needs.
Filter & Search Options
You can filter conversations by:
-
Specific chatbot
-
Read chats
-
Unread chats
-
Recent conversations
A search option is also available to quickly find visitors or specific chat sessions.
 Screenshot
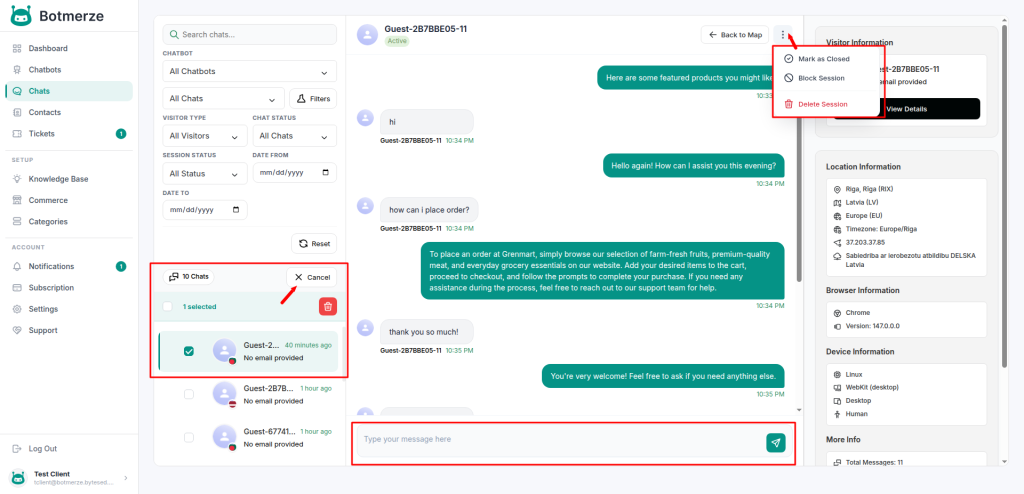
Chat Management
From this page, you can perform the following actions:
-
Open any conversation to view the full chat history
-
Mark chats as read or unread
-
Delete individual chat sessions from the conversation details page
-
Delete multiple chat records using bulk actions
-
Review chatbot responses and visitor messages
 Screenshot
Human Intervention
If Human Intervention is enabled for a chatbot, you can manually reply to visitors directly from the chat conversation page. This helps when a user needs personal assistance or when manual support is required.
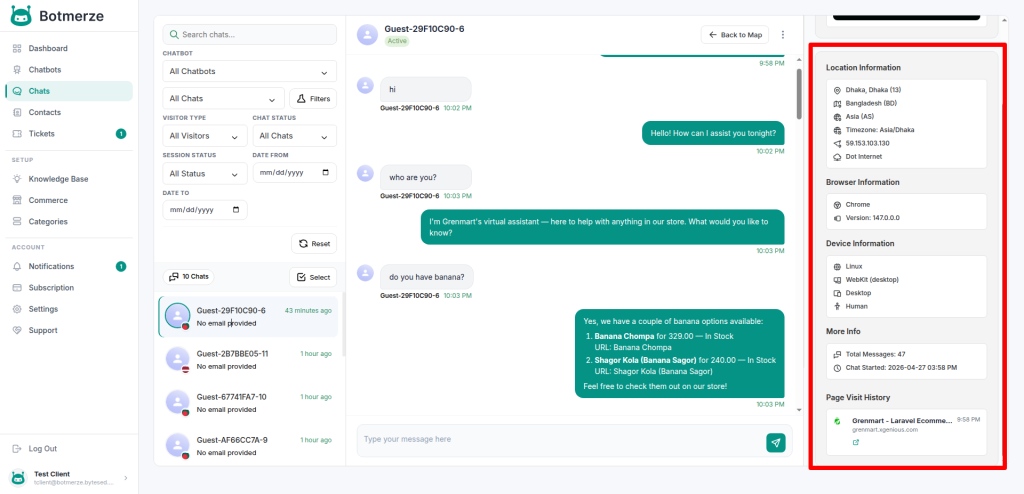
Visitor Details
Inside each conversation, you can view detailed visitor information, including:
-
Visitor location details
-
Browser name and version
-
Device type (Desktop, Mobile, Tablet)
-
Operating system information
-
Visited page history
 Screenshot
Knowledge Base
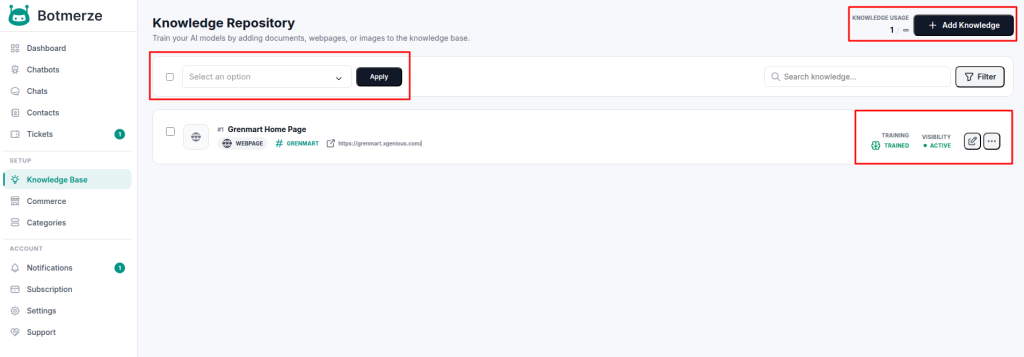
The Knowledge Base page displays a list of all your knowledge base entries. At the top-left of the list, you will find the Bulk Actions menu, allowing you to manage multiple entries at once.From the top-right, you can use the Add Knowledge button to create a new entry, along with search and filter options to quickly locate specific items.
The Knowledge Base is used to train AI model. The chatbot will generate responses based on the information you provide in your trained Knowledge Base.
 Screenshot
All Knowledge Base List Page
Add New Knowledge
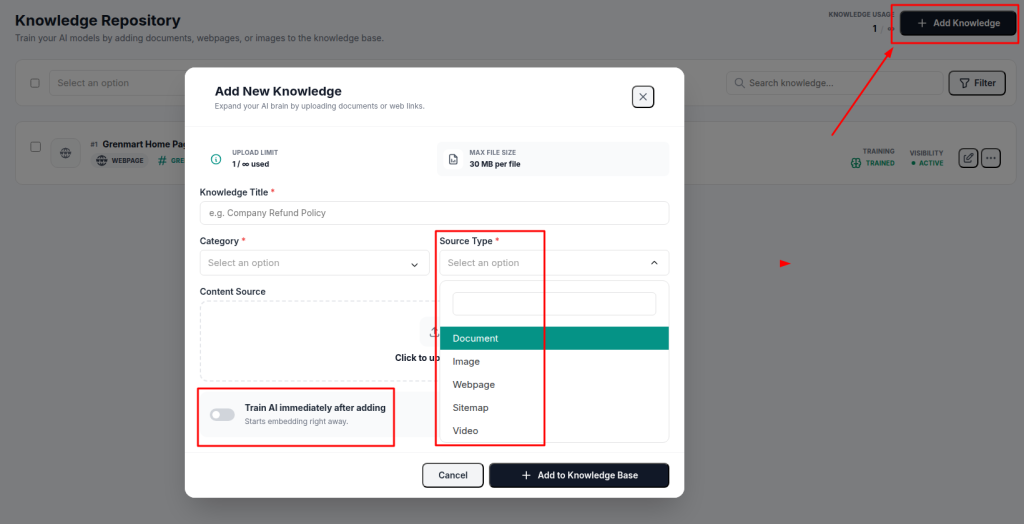
The Add New Knowledge modal allows you to create and upload new knowledge entries that will be used to train your AI model. This form provides several configurable fields to ensure that each knowledge item is properly categorized and processed.
Key Sections in the Modal
-
TitleEnter a clear and descriptive title for the knowledge entry. This helps define the topic and improves organization.
-
CategorySelect the appropriate category from the dropdown to group your knowledge items effectively.
-
Knowledge TypeChoose the type of knowledge you want to add:
Document – Upload files such as PDF, DOCX, and TXT formats for AI training.
-
Image – Upload image files such as PNG or JPG for OCR processing and AI training.
-
Webpage – Enter a website URL to allow the system to fetch and extract content automatically.
-
Sitemap – Add your website's sitemap URL so the system can scan multiple pages and collect content efficiently.
-
Video – Provide a YouTube video URL for content extraction and AI training.
-
Upload SectionBased on the selected type, you can upload a file (Document/Image) with a maximum file size.
-
Website URL (for Webpage Type)If you choose Webpage, you can enter the website URL.Note: Some websites may not be readable if they block web crawlers.
-
Train AI immediately after adding (Optional)Enabling this will trigger immediate knowledge synchronization. If unchecked, the item will be synced later.
 Screenshot
Add New Knowledge Modal
Manage Tickets
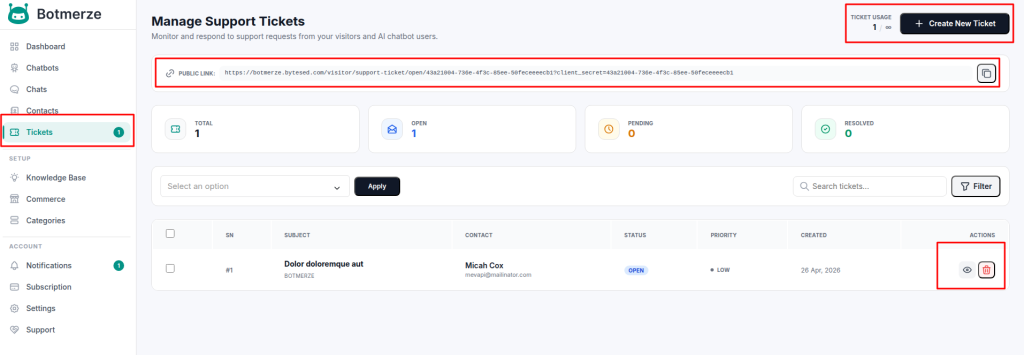
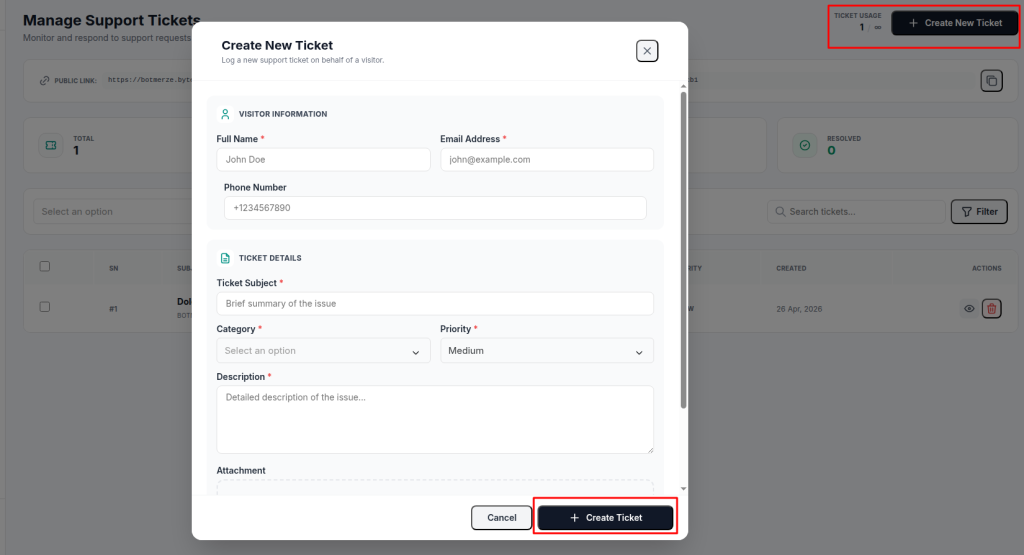
From this page, you can manage all tickets submitted by your users or visitors. The page displays a list of all tickets, along with options for bulk actions, filters, and a Create Ticket button that opens a modal for creating new tickets. You will also find a shareable link that can be sent to users or visitors, allowing them to submit tickets themselves.
 Screenshot
2. Ticket Creation Modal
Use this modal to create a new ticket. To create a ticket, you need to provide the following information:
-
Category
-
Priority
-
Title
-
Email
-
Description
Once submitted, the ticket will appear in the Ticket List page.
 Screenshot
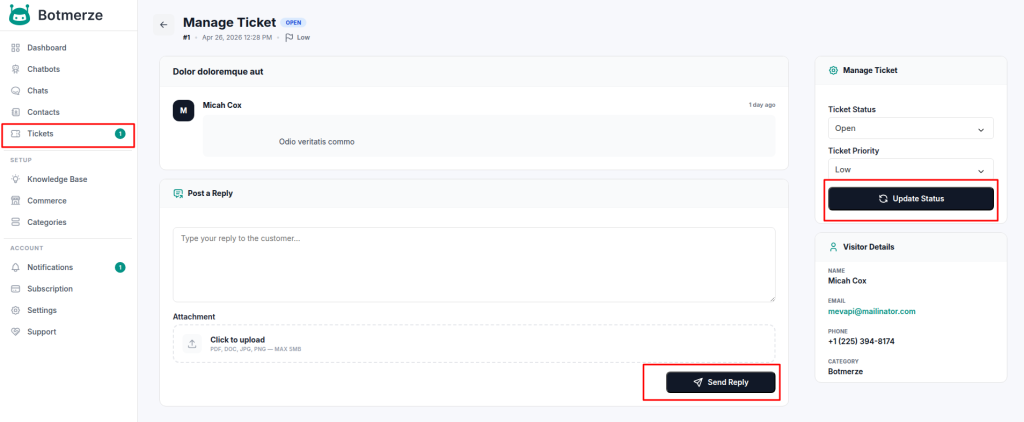
3. Support Ticket Details
The ticket details page allows you to:
-
View ticket information
-
Reply to user queries
-
Update ticket status
This helps you manage and resolve support issues efficiently.
 Screenshot
4. Hosted Link for Users/Visitors
A hosted link is available for users and visitors to create and manage tickets using their name and email. This ensures that users can track their tickets without logging into the admin panel.
 Screenshot
5. Visitor Ticket List Page
Visitors can view the list of their submitted tickets and create new tickets directly from this page.
 Screenshot
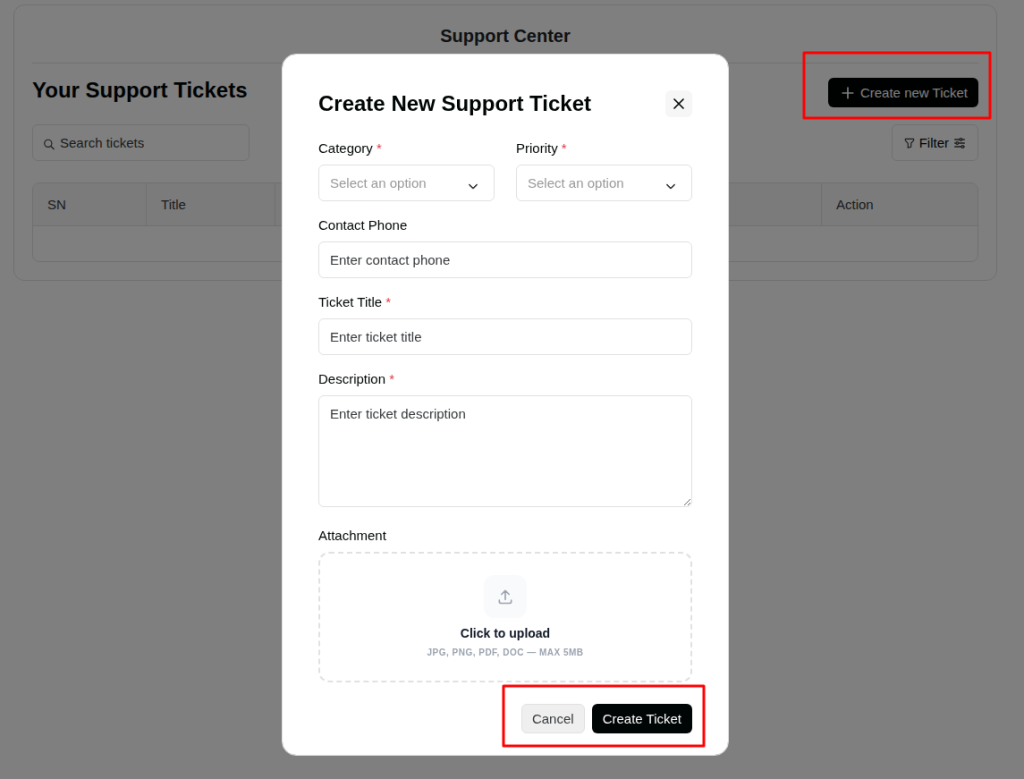
6. Ticket Creation Modal for Visitors
Visitors can use this modal to submit new tickets. They need to provide the required information such as category, priority, title, email, and description.
 Screenshot
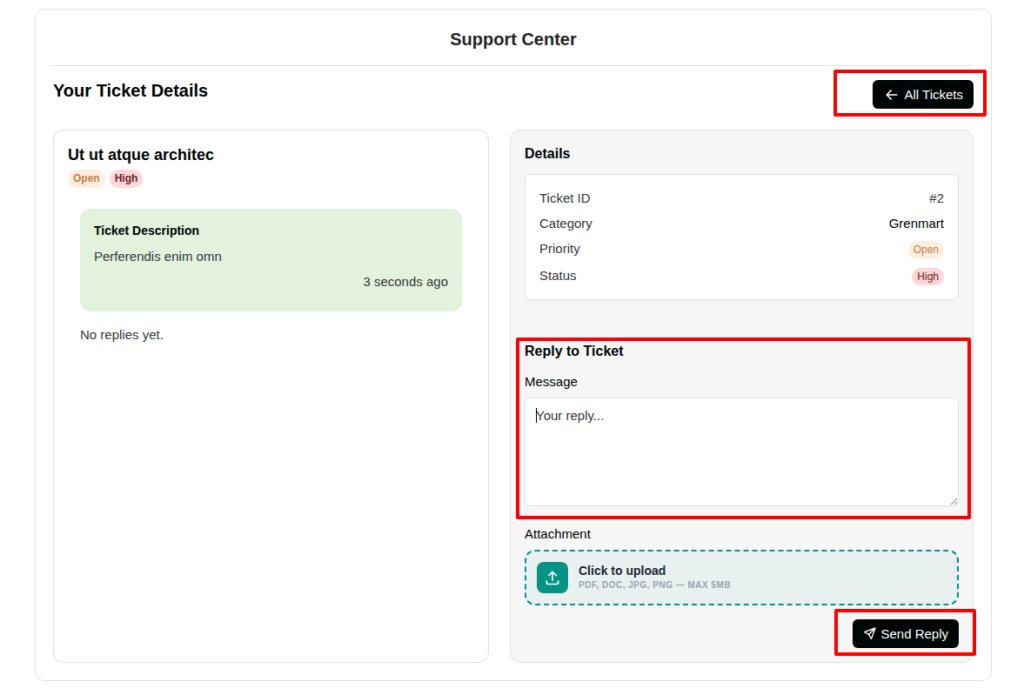
7. Ticket Details Page for Visitors
Visitors can view ticket details, reply to tickets, and track responses. This page ensures they stay updated on the progress of their requests.
 Screenshot
Subscription
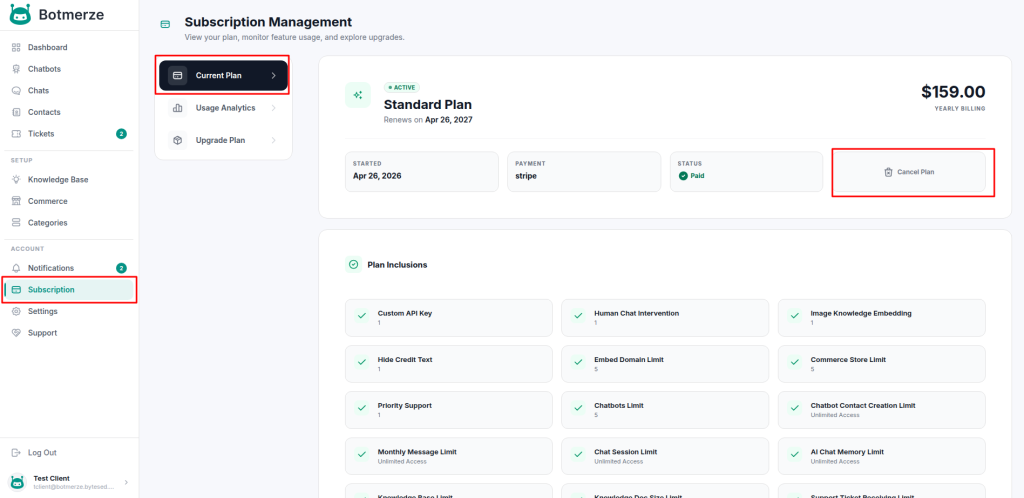
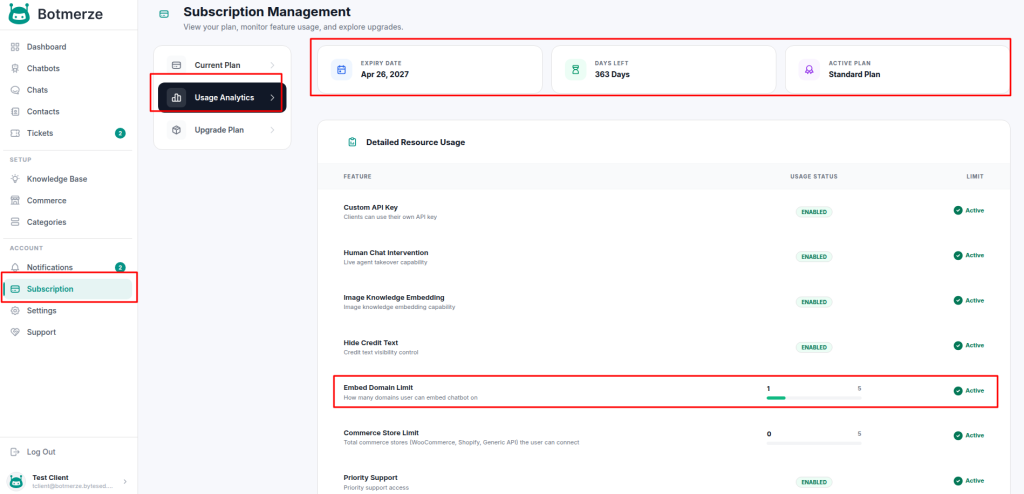
This section allows you to view all details related to your subscription plan.
1. Current Subscription
View the details of your active subscription, including plan type, duration, and other relevant information.
 Screenshot
2. Subscription Usage
Check your current subscription usage, including any limits, quotas, or activities associated with your plan.
 Screenshot
Manage Contacts
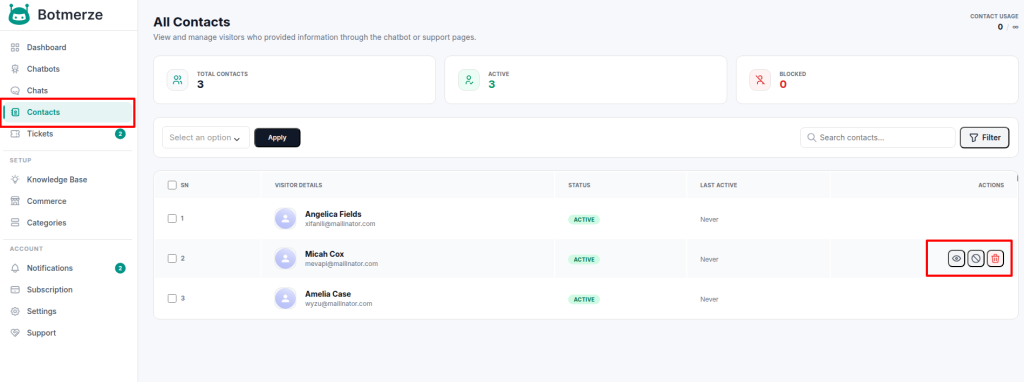
This page displays the contacts of visitors who have submitted information through the chatbot or the hosted ticket page.
From this page, you can:
-
Search and Filter: Easily find specific contacts using the search and filter options.
-
Bulk Actions: Perform actions on multiple contacts at once.
In the Actions column of the data table, you have the following options for each contact:
-
View Details: See complete information about the contact.
-
Block Contact: Prevent the contact from submitting further tickets or messages.
-
Delete: Permanently remove the contact from the system.
 Screenshot